前回はApp Extensionが起動されるところまででした。引き続き、App Extensionの設定と処理を見ていきます。
まず、App ExtensionのInfo.plistを修正します。
デフォルトの状態では、デバッグ用にサポートするコンテンツの設定が'TRUEPREDICATE'(つまり何でもあり)となっていますので、これを変更します。実際、リリース時には必ず変更する必要があります。
--(省略)--
<key>NSExtension</key>
<dict>
 <key>NSExtensionAttributes</key>
 <dict>
  <key>NSExtensionActivationRule</key>
  <string>TRUEPREDICATE</string>
 </dict>
 <key>NSExtensionMainStoryboard</key>
 <string>MainInterface</string>
 <key>NSExtensionPointIdentifier</key>
 <string>com.apple.share-services</string>
</dict>
--(省略)--
今回はテキストデータのみを扱うことにするので、以下のように変更します。
--(省略)--
<key>NSExtension</key>
<dict>
 <key>NSExtensionAttributes</key>
 <dict>
  <key>NSExtensionActivationRule</key>
  <dict>
   <key>NSExtensionActivationSupportsText</key>
   <true/>
   <key>NSExtensionActivationSupportsTextWithMaxCount</key>
   <integer>1</integer>
  </dict>
 </dict>
 <key>NSExtensionMainStoryboard</key>
 <string>MainInterface</string>
 <key>NSExtensionPointIdentifier</key>
 <string>com.apple.share-services</string>
</dict>
--(省略)--
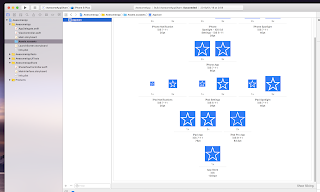
せっかくなのでアイコンも設定します。前回書いたように、Share Extensionの場合は、メニューのアイコンは、収容アプリケーションのアイコンが自動的に設定されますので、収容アプリケーション側のAssetsにアイコン画像を登録します。
 |
| 収容アプリのアイコンを設定 |
 |
| アイコンが表示されました |
※ちなみにAction Extensionの場合は、収容アプリケーションのアイコンを自動的に使用してくれないので、Extensionのターゲットの側にアイコンを用意します。
さぁ、やっとデータの取得です。App Extension側でシェアするコンテンツを取得します。ShareViewController.swiftの中を見ていきます。
isContentValid()の返値で、Postボタンの使用の可否を指定します。シェアするコンテンツのチェックなどをすると良いと思います。例えば取得するべき文字列が空の時はfalseを返すようにするとか。とりあえず今回は常にtrueを返すようにしておきます。
Postが押されたときのイベントはdidSelectPost()です。ここでコンテンツを取得します。試しにprint文で出力してみると。。。
import UIKit
import Social
import MobileCoreServices

class ShareViewController: SLComposeServiceViewController {

    override func isContentValid() -> Bool {
        // ここにチェックなど
        return true
    }

    override func didSelectPost() {
        guard let inputItems = self.extensionContext?.inputItems as? [NSExtensionItem] else {
            return
        }
        guard let providers = inputItems[0].attachments as? [NSItemProvider] else {
            return
        }

        for provider in providers {
            if provider.hasItemConformingToTypeIdentifier(kUTTypeText as String) {
                provider.loadItem(forTypeIdentifier: kUTTypeText as String, options: nil, completionHandler: { (item, _) in
                    OperationQueue.main.addOperation {
                        if let textItem = item as? String {
                            //printで出力
                            print("??? textItem= \(textItem)")
                        }
                    }
                })
                break
            }
        }

        self.extensionContext!.completeRequest(returningItems: [], completionHandler: nil)
    }

    override func configurationItems() -> [Any]! {
        // To add configuration options via table cells at the bottom of the sheet, return an array of SLComposeSheetConfigurationItem here.
        return []
    }
}
ちゃんと取得できています。
2018-01-26 01:12:27.499855+0900 AwesomeAppShare[7507:175699] [core] postButtonTapped
2018-01-26 01:12:27.507693+0900 AwesomeAppShare[7507:175699] [core] SLComposeServiceViewController-animateSendCard
2018-01-26 01:12:27.511739+0900 AwesomeAppShare[7507:175699] [core] SLComposeServiceViewController-keyboardDidChange
2018-01-26 01:12:27.861908+0900 AwesomeAppShare[7507:175699] [core] animateCardSend animation finished
??? textItem= The Dutch were in most of the Olympic sailing competitions represented by the Dutch Olympic Sailing Team.
2018-01-26 01:12:27.885422+0900 AwesomeAppShare[7507:175699] [core] SLComposeServiceViewController dealloc
2018-01-26 01:12:27.887536+0900 AwesomeAppShare[7507:175699] [core] SLSheetRootViewController dealloc
App Extensionは、できるだけ軽量である必要があります。Share Extensionのような、いわゆる「出来合いのテンプレート」だとそのまま使えばいいですが、Action Extensionのように「やろうと思えば色々できる」ものは、ついつい処理を盛りがちになってします。
そうすると、ユーザーがホストアプリケーションの共有メニューでそのExtensionを選んだときの反応が悪くなって、UXが台無しになってしまいます。
"App Extensionは、動作が高速で軽量であるとユーザが感じるようにしてください。App Extensionは素早く起動するように(1秒を大きく下回るように)設計します。起動が遅すぎるExtensionはシステムにより停止されます。"
「App Extensionプログラミングガイド」App Extensionを開発するより
そういったわけで、Extensionのターゲット内はできるだけ簡素に、収容アプリケーションにデータを渡すだけにして、主立った処理は収容アプリケーションの側で行う必要があります。
今回はここまで。
「使ってみた(App Extension編) その3」に続きます。
♪♪♪ こちらもどうぞ。 使ってみた(App Extension編) その1 使ってみた(App Extension編) その3 使ってみた(App Extension編) その4 使ってみた(App Extension編) その5 使ってみた(App Extension編) おまけ
